| ID |
Date |
Author |
Project |
Subject |
Run Number |
Events |
StartTime |
EndTime |
|
7
|
Mon Jul 6 16:22:36 2009 |
Stephan H�nsel | SiLC | Measurements - Sensors | | | | |
Pt Modules:
Optical Modules:
ITE Modules:
|
|
8
|
Mon Jul 6 16:23:51 2009 |
Stephan H�nsel | SiLC | Module Components | | | | |
Pt Modules:
Pt-1:
hybrid: h01-4APV
bottom sensor: 30210331516116
top sensor: 30210332911309
Pt-2:
hybrid: h02-4APV
bottom sensor: 30210331415917
top sensor: 30210314845402
Optical Modules:
Opt_AC-Test-1:
hybrid: h21-2APV
sensor: HPK-ILC-TS-SPL-6687-05
Opt_AC-Test-2:
hybrid: h22-2APV
sensor: HPK-ILC-TS-SPL-6687-07
modules with SiLC alignment sensors:
Opt-1:
hybrid: h03
sensor: HPK-SPL-6686-03
Opt-2:
hybrid: h04
sensor: HPK-SPL-6686-07
ITE Modules: |
|
9
|
Thu Jul 9 10:29:58 2009 |
Stephan H�nsel | SiLC | Measurements - Modules | | | | |
Pt Modules:
- Sensoren sind Luftfeuhtigkeitsempfindlich
- die Sensoren brauchen einige Zeit unter Spannung bis sie sich bei einem akzeptablen Strom stabilisieren
small Problems:
Optical Modules:
small Problems with h03-Module:
ITE Modules:
|
|
10
|
Fri Jul 17 14:03:21 2009 |
Stephan H�nsel | | What to measure | | | | |
Origami
Testbeam08 Module
- Anglescan
Pt Modules (2Stück - je 2 Sensoren):
Anglescan
- einzelne module (auch als "stub" (fixer Abstand zwischen ihnen) ?)
wichtig: brauchen wir 2 Testbeam08 module um 90° verdreht für höheninformation??? (sensoren in den Pt-modulen sind nicht 100%ig parallel - MESSEN!)
Optical Modules:(DAUER ca 18 Stunden)
- tests in box mit laserbeam (laser auf anderer Höhe al beam?!? - sonst geht der beam durch den Laser)
ITE Modules:
- 8 ter stack: (2 Testbeam08 module quer + 2 x 1stmetal128 + 2 x 2nd metal 128 + 2 x normal128)
- 2ndmetal512 module 3 stück bauen und im beam versetzt einbauen parasitär bei den spanier-modulen)
zusätliche ideen:
- CMS-Tracker slice (2Pt + 2 optische + 3 2ndmetal512 hintereinander in unterschiedlichen winkeln um einen tracker-slice zu simulieren - CMS-layout !?!)
|
|
13
|
Fri Aug 14 16:45:25 2009 |
Stephan H�nsel | | Module - Setups | | | | |
- 5mm Inbus-Schlüssel
- 3mm Inbus Schlüssel
- 6- 2(1) x 30 Pt-Pins
- beim 5mm-Sockel müssen die 2 Löcher über die das optische Modul h03 verschraubt wird noch ausgeweitet werden (Thomas)
- bei Pt-Deckel oben einzeichnen welche Balkenstellung welchem Winkel entspricht
(SK) ... SenkKopf
(ZK) ... ZylinderKopf
OPTISCHER SETUP - Setup-alignment-modules
upstream - BEAM VON UNTEN - APV-Nummerierung in Beamrichtung von links anfangend
1) Collimator
- Alu-Spacer (neuer = höheren verwenden) + 4- M6 x 15 (ZK)
- schwarzer-Spanier-x-y-z-Tisch - Schreuben dabei -> Plastikschrauben abschneiden ?!?
2) 5mm Spacer + h03 - backplane richtung Collimator - APV3210
- 2- M4 x 15 (SK) - 5mm Spacer durch Alignment-Boden mit h03 verschrauben
- 3- M4 x 15 (SK) - Alignment-Boden auf Drehteller verschrauben
3) h04 - backplane richtung Collimator - APV3210
- 2 Positionen
- 2- M4 x 10 (SK)
Pt + ITE-512-Stack + 3 SiLC08-Module
upstream - BEAM VON UNTEN - APV-Nummerierung in Beamrichtung von links anfangend
1) h06-ITE-512 - APV0123 (allerdings nur eineinhalb APVs gebondet!)
2) h05-ITE-512 - APV0123
3) h07-ITE-512 - APV3210 !!!
4) SiLC08-2 - APV12 - 90° gedreht
5) SiLC08-1 - APV12 - 90° gedreht
6) SiLC08-0 - APV12 - 90° gedreht
Stack 1) bis 6)
- schwarzer Sockel +4- M4 x 35 (ZK) -> verschraubt in h06 und h07
- 2 Gewindestangen M6 x 80 + 4 Scheiben + 4 Muttern M6 -> die 3 ITE-512er zusammen
- 3 Gewindestangen M6 x 160 + 6 Scheiben + 5 Flügelmuttern M6 + 1 Mutter M6 -> 3- SiLC08-Module VORSICHTIG dazu
7) h02-Pt - APV0123 - überprüfen - kann rotieren ;-)
- Schrauben gehen von oben (ausserhalb der Box): Balken - Box-Deckel - Beilagscheibe - Pt-Modul
- Balken + 4- 2(1) x 30 Pins + 2- Scheiben + 2- M4 x 20
8) h01-Pt - APV0123 - überprüfen - kann rotieren;-)
- Schrauben gehen von oben (ausserhalb der Box): Balken - Box-Deckel - Beilagscheibe - Pt-Modul
- Balken + 4- 2(1) x 30 Pins + 2- Scheiben + 2- M4 x 20
ITE128-Stack
upstream - BEAM VON UNTEN - APV-Nummerierung in Beamrichtung von links anfangend
1) h21_alignment-TS05 - APV12 - 90°gedreht
2) h13_ITE-PAS - APV1
3) h14_ITE-PAS - APV1
4) h15_ITE-PAD - APV1
5) h16_ITE-PAD - APV1
6) h11_ITE-STD - APV1
7) h12_ITE-STD - APV1
8) h22-alignment-TS07 - APV12 - 90°gedreht
Schrauben verwenden je nach Sockel und Spacer
SiLC08-Stack
upstream - BEAM VON UNTEN - APV-Nummerierung in Beamrichtung von links anfangend
1) SiLC08-7 - APV12 - Überprüfen
2) SiLC08-6 - APV12 - Überprüfen
3) SiLC08-5 - APV12 - Überprüfen
4) SiLC08-4 - APV12 - Überprüfen
5) SiLC08-3 - APV12 - Überprüfen
6) SiLC08-2 - APV12 - Überprüfen
7) SiLC08-1 - APV12 - Überprüfen
8) SiLC08-0 - APV12 - Überprüfen
Schrauben verwenden je nach Sockel und Spacer |
|
11
|
Fri Jul 31 19:23:26 2009 |
Thomas Bergauer | | Laser Spot size | | | | |
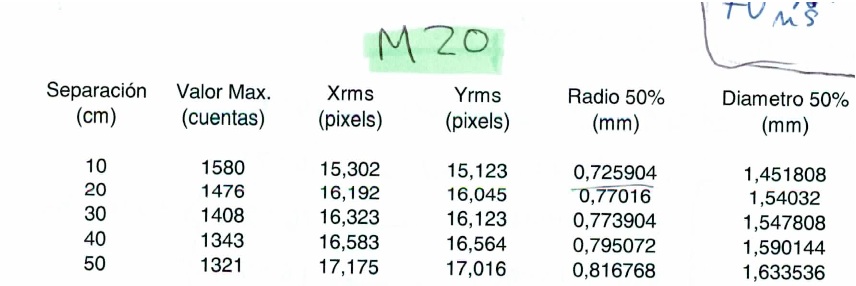
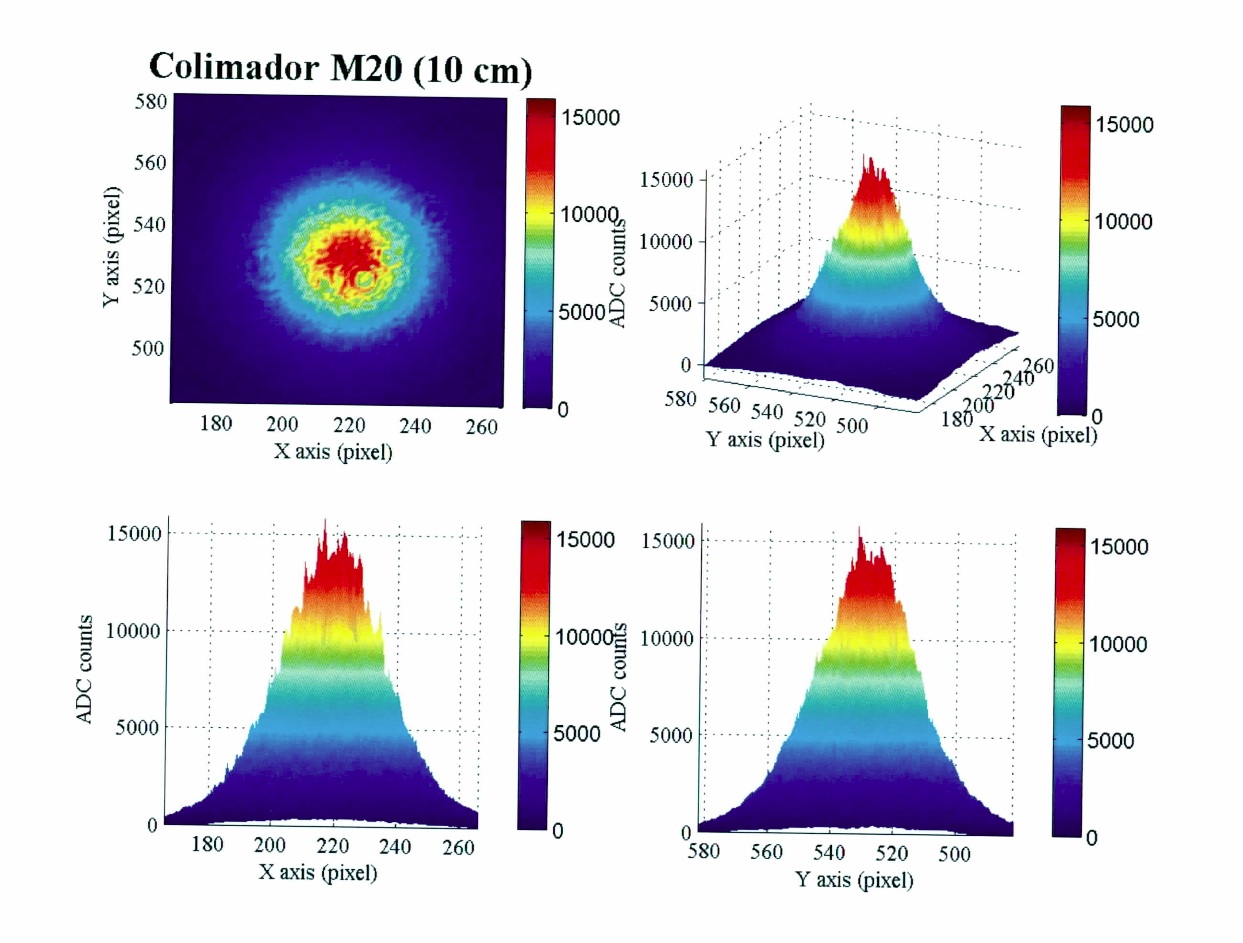
| 10cm nach Kollimator: Durchmesser 1.45mm (FWHM)
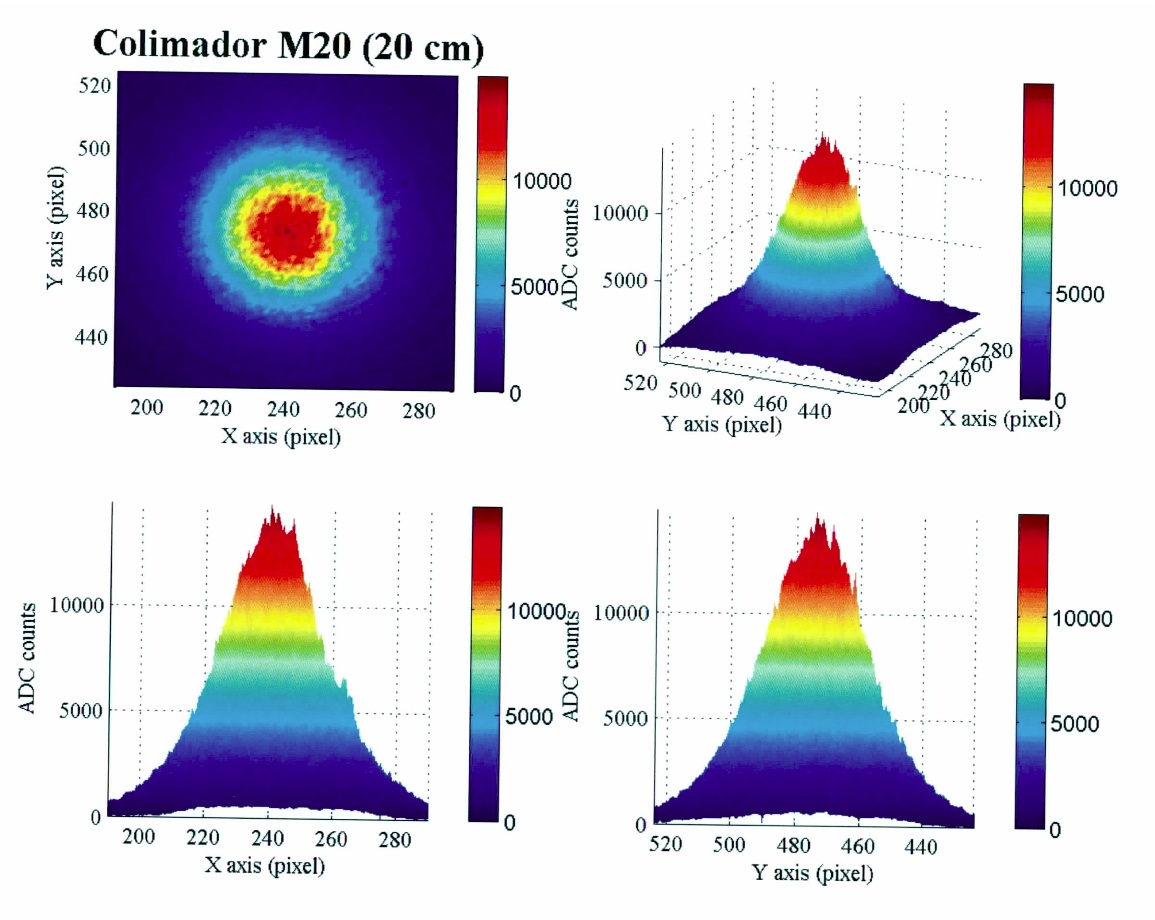
20cm nach Kollimator: Durchmesser 1,54mm (FWHM) |
| Attachment 1: laser_spot_overview.jpg
|
 |
| Attachment 2: laser_spot_10cm.jpg
|
 |
| Attachment 3: laser_spot_20cm.jpg
|
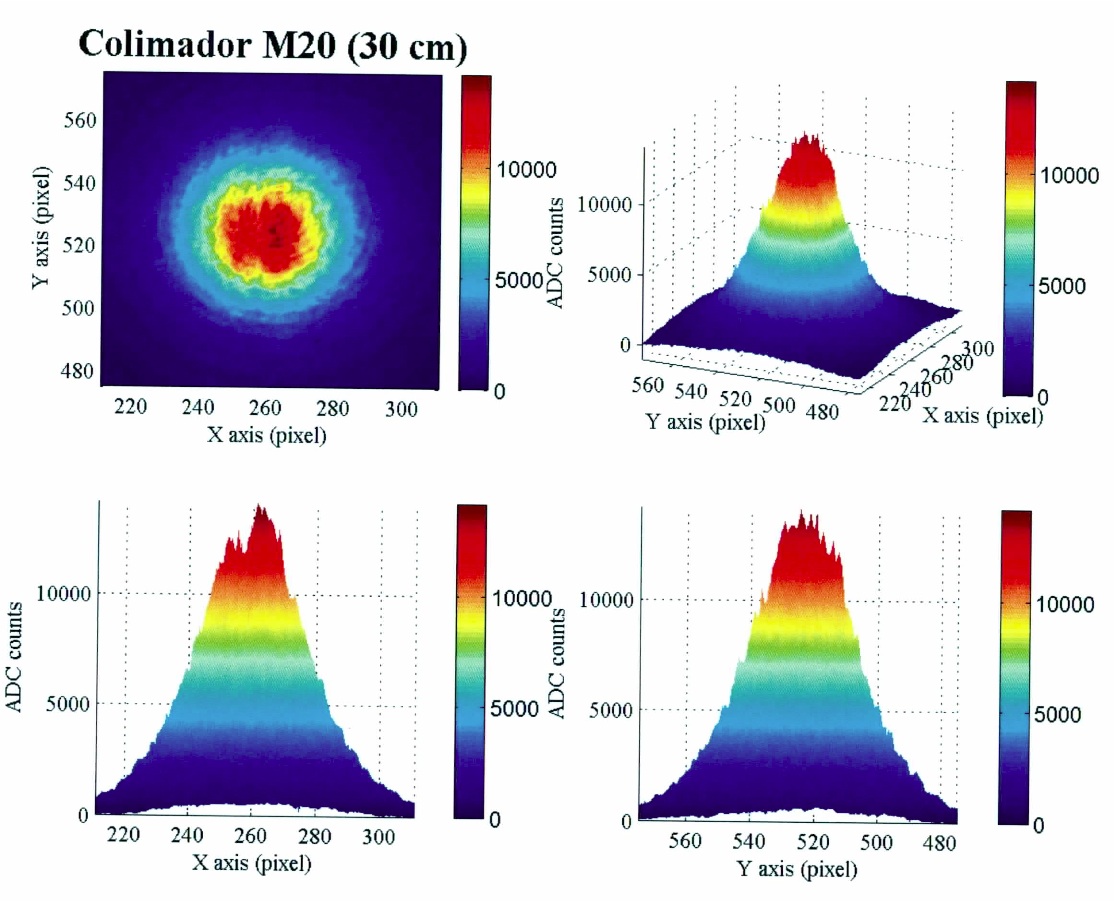
 |
| Attachment 4: laser_spot_30cm.jpg
|
 |
|
14
|
Fri Aug 14 19:35:43 2009 |
Thomas Bergauer | Pt_ITE512 | intcal | | | | |
HV=100V except h05-ITE-512 and h06-ITE-512 (runaway, HV off)
h01-Pt: 10uA
h02-Pt: 1.6uA
3 SiLC DUTs mit je ca. 38nA
h07-ITE-512: 3.77uA
h05-ITE-512: breakthrough
h06-ITE-512: breakthrough |
|
58
|
Fri Aug 21 22:42:32 2009 |
Thomas Bergauer | common | EUDAQ config file used when running with telescope | | | | |
Used until Friday, 21.08.09:


AndMask = 0xf # 4x4 mm scintillator for trigger


Used since Friday, 21.08.09:

AndMask = 0xc # 9x9 mm scintillator for trigger
Local trigger using TLU only: ALWAYS WITH 9x9mm scintillator
|
| Attachment 1: testfortis_with_eudrb_beam_backpressure_WITH_SILC.conf
|
[RunControl]
RunSizeLimit = 1800000000
NoTrigWarnTime = 10

[DataCollector]

[LogCollector]
SaveLevel = EXTRA
PrintLevel = INFO

[Producer.TLU]
AndMask = 0xc # 9x9 mm scintillaotr for trigger
#AndMask = 0xf # 4x4 mm scintillator for trigger
OrMask = 0
VetoMask = 0
# EUDRB plugged into DUT#4 , FORTIS plugged into DUT#1, SiLC plugged into DUT#0
#DutMask = 20 # EUDRB, FORTIS, SiLC in
DutMask = 17 # FORTIS, SiLC in
EnableDUTVeto = 2#0
TriggerInterval = 0
TrigRollover = 0
StrobePeriod = 16000000
StrobeWidth = 480000

[Producer.EUDRB]
Version = 2
Det = MIMOTEL
Mode = ZS
Unsynchronized = 1
AdcDelay = 3
ClkSelect = 2
#Marker1 = 0xff
#Marker2 = 0xff
PostDetResetDelay = 4
PedestalFile = auto
IDOffset = 0
NumBoards = 6
Board0.Slot = 3
Board1.Slot = 5
Board2.Slot = 7
Board3.Slot = 9
Board4.Slot = 11
Board5.Slot = 13

[Producer.FORTIS]
# Need \ not / for directory name with Cygwin...
# ExecutableDirectory = /home/cussans/optodaq/halsall_test_v5/
ExecutableDirectory = /home/cussans/optodaq/MyF11/
# ExecutableDirectory = /home/cussans/optodaq/MyF10/
ExecutableProcessName = optodaqV.exe
#ExecutableFilename = test_run_128_block_mod_C2.bat
ExecutableFilename = test_run_512_128_block_mod_CX.bat
# ExecutableFilename = test_run_512_448_block_mod_full.bat
ExecutableArgs =
NumRows = 512
NumColumns = 128
|
|
60
|
Sat Aug 22 03:27:13 2009 |
Thomas Bergauer | BELLE | APVDAQ + telescope 31,8 MHz transparent mode (cooling?) | run014 | 75k | 22.08.2009 03:25:23 | 22.08.2009 07:08:09 |
HV=80V, 31.8 MHz, beam on, 120 GeV
6 samples
chiller set to 13 deg.
f=31.8 MHz
config file: cern09_belle_31.8mhz_multi6.cfg
there was probably no water flow throught the pipe of the origami module during this run --> must be repeated
|
|
61
|
Sat Aug 22 08:32:02 2009 |
Thomas Bergauer | BELLE | APVDAQ + telescope 31,8 MHz hit mode (cooling?) | run015 | 75k | 22.08.2009 08:15:05 | 22.08.2009 09:25:21 |
HV=80V, 31.8 MHz, beam on, 120 GeV
6 samples, hit mode, hitcut=4
chiller set to 13 deg.
f=31.8 MHz
config file: cern09_belle_31.8mhz_hit_multi6.cfg
there was probably no water flow throught the pipe of the origami module during this run --> must be repeated
|
|
62
|
Sat Aug 22 09:44:50 2009 |
Thomas Bergauer | BELLE | APVDAQ + telescope 31,8 MHz hit mode (cooling?) | run016 | 75k | 22.08.2009 09:42:38 | 22.08.2009 10:24:05 |
HV=80V, 31.8 MHz, beam on, 120 GeV
6 samples, hit mode, hitcut=5
chiller set to 13 deg.
f=31.8 MHz
config file: cern09_belle_31.8mhz_hit_cut5_multi6.cfg
there was probably no water flow throught the pipe of the origami module during this run!
|
|
63
|
Sat Aug 22 10:28:50 2009 |
Thomas Bergauer | BELLE | APVDAQ + telescope 40 MHz hit mode (cooling?) | run017 | 75k | 22.08.2009 10:26:28 | 22.08.2009 11:16:12 |
HV=80V, 40 MHz, beam on, 120 GeV
6 samples, hit mode, hitcut=4
chiller set to 13 deg.
f=40 MHz
config file: cern09_belle_hit_multi6.cfg
there was probably no water flow throught the pipe of the origami module during this run!
|
|
64
|
Sat Aug 22 11:26:00 2009 |
Thomas Bergauer | BELLE | APVDAQ + telescope 40 MHz hit mode (cooling?) | run018 | 75k | 22.08.2009 11:16:57 | 22.08.2009 11:58:56 |
HV=80V, 40 MHz, beam on, 120 GeV
6 samples, hit mode, hitcut=5
chiller set to 13 deg.
f=40 MHz
config file: cern09_belle_hit_cut5_multi6.cfg
trigger rate about 3500 ev / spill
there was probably no water flow throught the pipe of the origami module during this run!
|
|
65
|
Sat Aug 22 11:54:49 2009 |
Thomas Bergauer | common | beam profile | | | | |
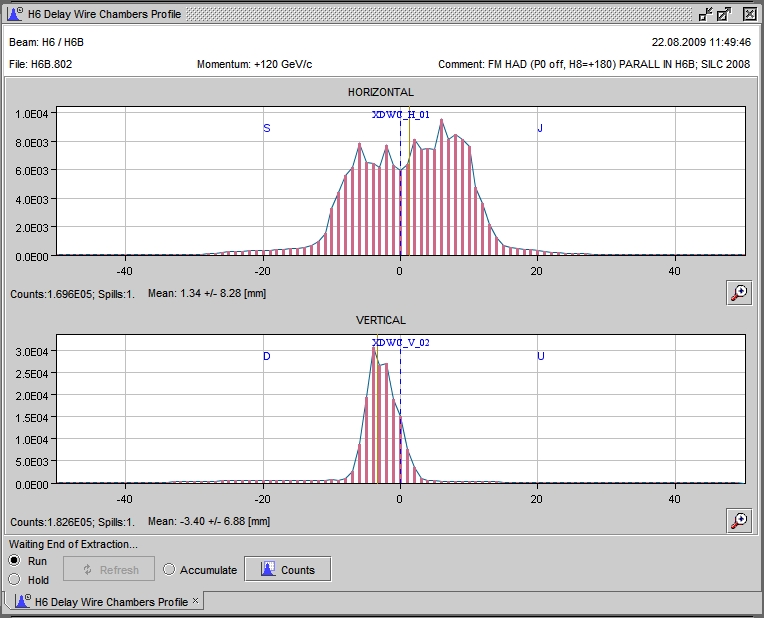
beam shifted a bit in vertical direction downwards since 21. August 09 evening
Beam configuration:
Beam configuration file: H6b.802 (FM HAD (P0 off, H8=+180) PARLALLEL IN H6B SILC 2008 |
| Attachment 1: 20090822_1150_beam_conditions.jpg
|
 |
|
71
|
Sat Aug 22 15:12:44 2009 |
Thomas Bergauer | common | beam profile | | | | |
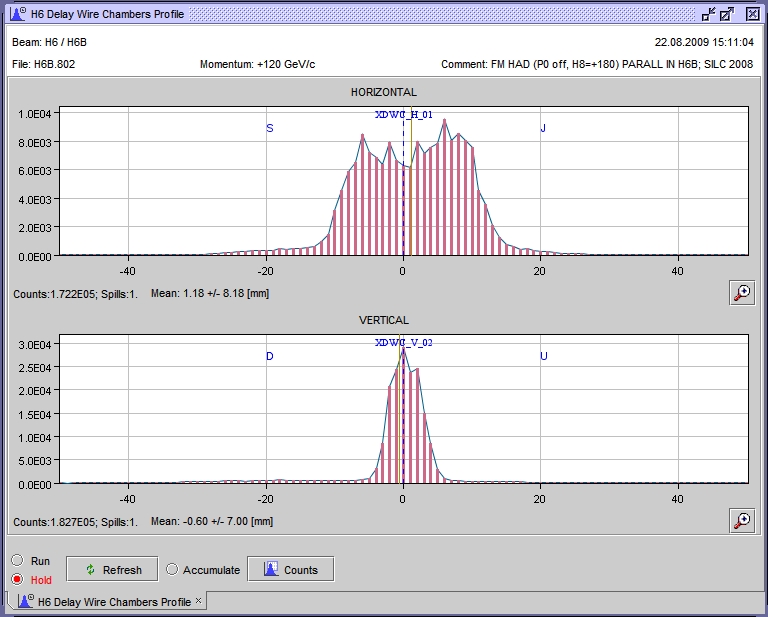
playing with TRIM4 in vertical plane (setting to 20A current) shifted beamspot back to center position
Beam configuration:
Beam configuration file: H6b.802 (FM HAD (P0 off, H8=+180) PARLALLEL IN H6B SILC 2008
Rate: 3.35E5 particles/spill (measured with SCINT8 in beamline)
Particle Production Applet
Calculator applet
For +120 Gev/c beam:
| Pi+ |
55.67 % |
| p |
38.95 % |
| K+ |
5.38 % |
|
| Attachment 1: 20090822_1511_beam_conditions.jpg
|
 |
|
77
|
Sun Aug 23 01:46:03 2009 |
Thomas Bergauer | ITE128 | 2nd run with ITE128: central position | run021 | 100k | 23.08.09 00:10 (ca.) | 23.08.2009 02:15:10 |
ITE128
HV = 70V, 40MHz, 120 GeV
TLU trigger w telescope
XY-Table: x=48, y=115.31
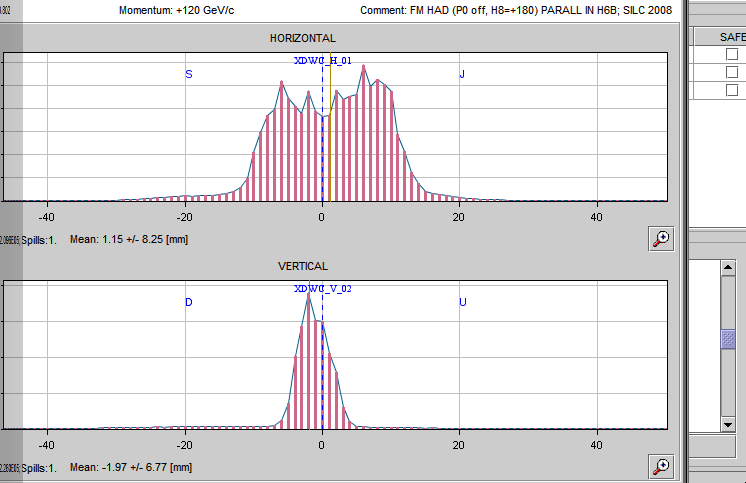
new beam position (used TRIM4 magnet at 7A): y down by 2mm. see attached picture |
| Attachment 1: Picture_1.png
|
 |
|
78
|
Sun Aug 23 02:18:20 2009 |
Thomas Bergauer | ITE128 | 2nd run with ITE128: top position (3mm below center); during night | run022 | 407895 | 23.08.2009 02:16:21 | 23.08.2009 08:04:09 |
ITE128
HV = 70V, 40MHz, 120 GeV
TLU trigger w telescope
XY-Table: x=48, y=112.31 |
| Attachment 1: Picture_1.png
|
 |
|
79
|
Sun Aug 23 08:13:31 2009 |
Thomas Bergauer | ITE128 | 2nd run with ITE128: top position (4mm below center) | run023 | 100k | 23.08.2009 08:06:58 | 23.08.2009 09:30:53 |
ITE128
HV = 70V, 40MHz, 120 GeV
TLU trigger w telescope
XY-Table: x=48, y=111.31 |
|
94
|
Tue Aug 25 09:00:51 2009 |
Thomas Bergauer | | beam conditions | | | | |
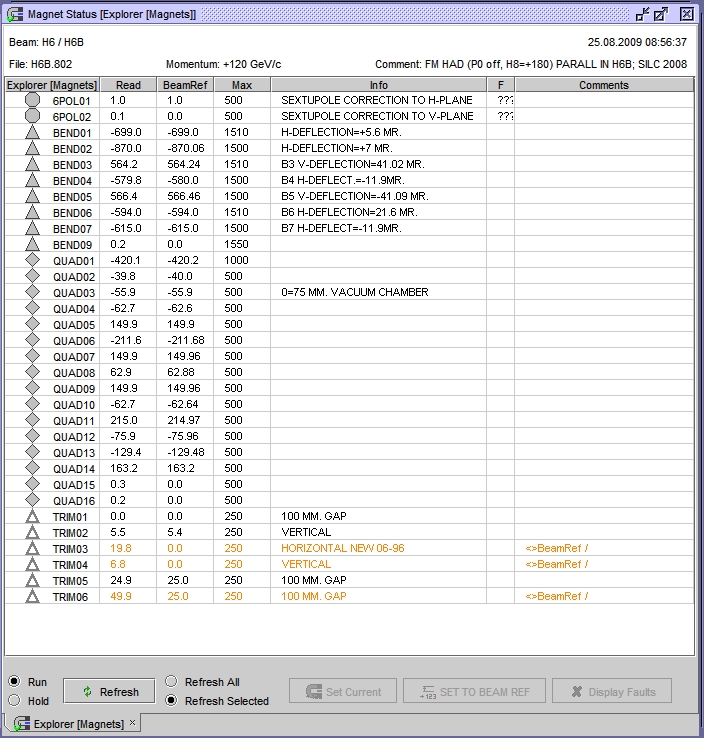
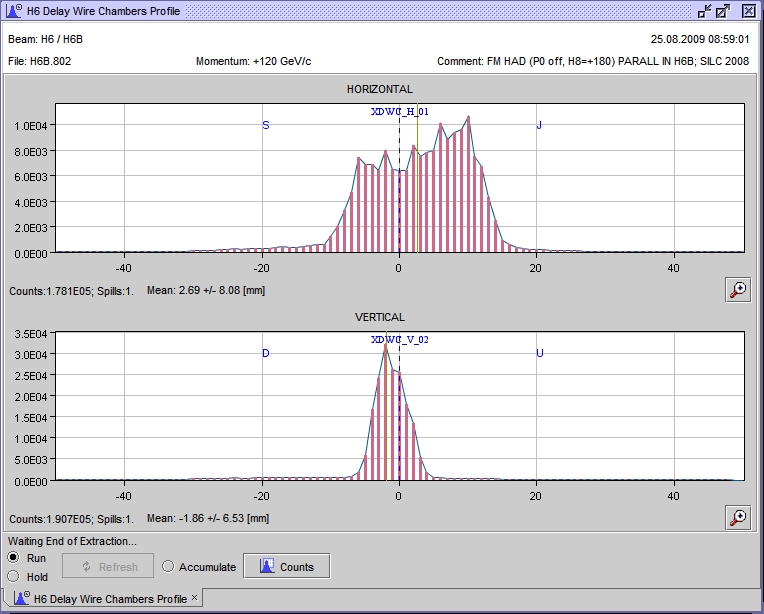
manually changed TRIM3, TRIM4 and TRIM6 |
| Attachment 1: magnet_settings_withH6B.802.jpg
|
 |
| Attachment 2: 20090825_0859_beam_conditions.jpg
|
 |
|
97
|
Tue Aug 25 11:26:23 2009 |
Thomas Bergauer | Pt_ITE512 | Pt_ITE512 6deg NO air! | run036 | 20k | 25.08.2009 11:25 | 25.08.2009 12:19:55 |
Pt: 6 Grad, HV=200V, 20% (start run) to % (end run) RH, beam on, 120GeV
ITE512: HV=70V,
X-Y-Table: x=99.6, y=36
MOEGLICHERWEISE WAR EIN MODUL AUF 8 GRAD |