| ID |
Date |
Author |
Project |
Subject |
Run Number |
Events |
StartTime |
EndTime |
|
97
|
Tue Aug 25 11:26:23 2009 |
Thomas Bergauer | Pt_ITE512 | Pt_ITE512 6deg NO air! | run036 | 20k | 25.08.2009 11:25 | 25.08.2009 12:19:55 |
Pt: 6 Grad, HV=200V, 20% (start run) to % (end run) RH, beam on, 120GeV
ITE512: HV=70V,
X-Y-Table: x=99.6, y=36
MOEGLICHERWEISE WAR EIN MODUL AUF 8 GRAD |
|
1
|
Mon Jul 6 12:22:47 2009 |
Stephan Hänsel | SiLC | Measurements - hybrids with APV | | | | |
Pt Modules:
Optical Modules:
ITE Modules:
|
|
2
|
Mon Jul 6 12:24:53 2009 |
Stephan Hänsel | SiLC | Module Drawings | | | | |
Pt Modules:
Optical Modules:
ITE Modules: :
|
|
5
|
Mon Jul 6 12:29:20 2009 |
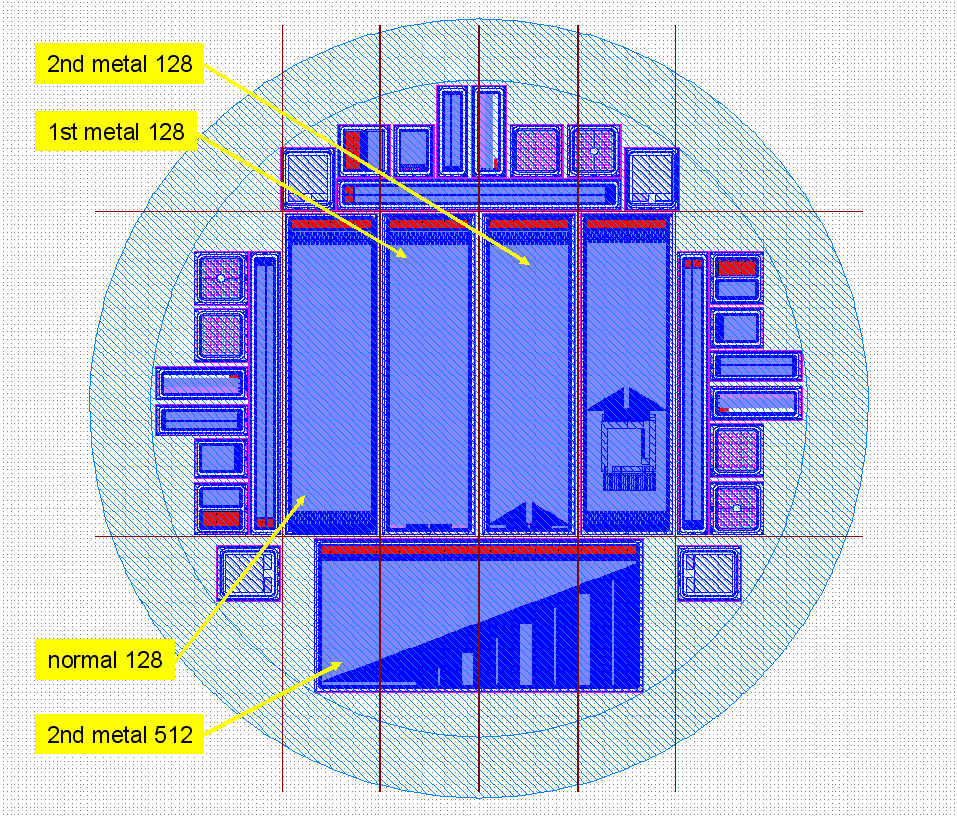
Stephan Hänsel | SiLC | Sensors - layout | | | | |
Pt Modules:
CMS OB1 Sensors:
Optical Modules:
Sensors:
ITE Modules:
|
| Attachment 1: Wafer-Screenshot.png
|
 |
|
7
|
Mon Jul 6 16:22:36 2009 |
Stephan Hänsel | SiLC | Measurements - Sensors | | | | |
Pt Modules:
Optical Modules:
ITE Modules:
|
|
8
|
Mon Jul 6 16:23:51 2009 |
Stephan Hänsel | SiLC | Module Components | | | | |
Pt Modules:
Pt-1:
hybrid: h01-4APV
bottom sensor: 30210331516116
top sensor: 30210332911309
Pt-2:
hybrid: h02-4APV
bottom sensor: 30210331415917
top sensor: 30210314845402
Optical Modules:
Opt_AC-Test-1:
hybrid: h21-2APV
sensor: HPK-ILC-TS-SPL-6687-05
Opt_AC-Test-2:
hybrid: h22-2APV
sensor: HPK-ILC-TS-SPL-6687-07
modules with SiLC alignment sensors:
Opt-1:
hybrid: h03
sensor: HPK-SPL-6686-03
Opt-2:
hybrid: h04
sensor: HPK-SPL-6686-07
ITE Modules: |
|
9
|
Thu Jul 9 10:29:58 2009 |
Stephan Hänsel | SiLC | Measurements - Modules | | | | |
Pt Modules:
- Sensoren sind Luftfeuhtigkeitsempfindlich
- die Sensoren brauchen einige Zeit unter Spannung bis sie sich bei einem akzeptablen Strom stabilisieren
small Problems:
Optical Modules:
small Problems with h03-Module:
ITE Modules:
|
|
10
|
Fri Jul 17 14:03:21 2009 |
Stephan Hänsel | | What to measure | | | | |
Origami
Testbeam08 Module
- Anglescan
Pt Modules (2Stück - je 2 Sensoren):
Anglescan
- einzelne module (auch als "stub" (fixer Abstand zwischen ihnen) ?)
wichtig: brauchen wir 2 Testbeam08 module um 90° verdreht für höheninformation??? (sensoren in den Pt-modulen sind nicht 100%ig parallel - MESSEN!)
Optical Modules:(DAUER ca 18 Stunden)
- tests in box mit laserbeam (laser auf anderer Höhe al beam?!? - sonst geht der beam durch den Laser)
ITE Modules:
- 8 ter stack: (2 Testbeam08 module quer + 2 x 1stmetal128 + 2 x 2nd metal 128 + 2 x normal128)
- 2ndmetal512 module 3 stück bauen und im beam versetzt einbauen parasitär bei den spanier-modulen)
zusätliche ideen:
- CMS-Tracker slice (2Pt + 2 optische + 3 2ndmetal512 hintereinander in unterschiedlichen winkeln um einen tracker-slice zu simulieren - CMS-layout !?!)
|
|
13
|
Fri Aug 14 16:45:25 2009 |
Stephan Hänsel | | Module - Setups | | | | |
- 5mm Inbus-Schlüssel
- 3mm Inbus Schlüssel
- 6- 2(1) x 30 Pt-Pins
- beim 5mm-Sockel müssen die 2 Löcher über die das optische Modul h03 verschraubt wird noch ausgeweitet werden (Thomas)
- bei Pt-Deckel oben einzeichnen welche Balkenstellung welchem Winkel entspricht
(SK) ... SenkKopf
(ZK) ... ZylinderKopf
OPTISCHER SETUP - Setup-alignment-modules
upstream - BEAM VON UNTEN - APV-Nummerierung in Beamrichtung von links anfangend
1) Collimator
- Alu-Spacer (neuer = höheren verwenden) + 4- M6 x 15 (ZK)
- schwarzer-Spanier-x-y-z-Tisch - Schreuben dabei -> Plastikschrauben abschneiden ?!?
2) 5mm Spacer + h03 - backplane richtung Collimator - APV3210
- 2- M4 x 15 (SK) - 5mm Spacer durch Alignment-Boden mit h03 verschrauben
- 3- M4 x 15 (SK) - Alignment-Boden auf Drehteller verschrauben
3) h04 - backplane richtung Collimator - APV3210
- 2 Positionen
- 2- M4 x 10 (SK)
Pt + ITE-512-Stack + 3 SiLC08-Module
upstream - BEAM VON UNTEN - APV-Nummerierung in Beamrichtung von links anfangend
1) h06-ITE-512 - APV0123 (allerdings nur eineinhalb APVs gebondet!)
2) h05-ITE-512 - APV0123
3) h07-ITE-512 - APV3210 !!!
4) SiLC08-2 - APV12 - 90° gedreht
5) SiLC08-1 - APV12 - 90° gedreht
6) SiLC08-0 - APV12 - 90° gedreht
Stack 1) bis 6)
- schwarzer Sockel +4- M4 x 35 (ZK) -> verschraubt in h06 und h07
- 2 Gewindestangen M6 x 80 + 4 Scheiben + 4 Muttern M6 -> die 3 ITE-512er zusammen
- 3 Gewindestangen M6 x 160 + 6 Scheiben + 5 Flügelmuttern M6 + 1 Mutter M6 -> 3- SiLC08-Module VORSICHTIG dazu
7) h02-Pt - APV0123 - überprüfen - kann rotieren ;-)
- Schrauben gehen von oben (ausserhalb der Box): Balken - Box-Deckel - Beilagscheibe - Pt-Modul
- Balken + 4- 2(1) x 30 Pins + 2- Scheiben + 2- M4 x 20
8) h01-Pt - APV0123 - überprüfen - kann rotieren;-)
- Schrauben gehen von oben (ausserhalb der Box): Balken - Box-Deckel - Beilagscheibe - Pt-Modul
- Balken + 4- 2(1) x 30 Pins + 2- Scheiben + 2- M4 x 20
ITE128-Stack
upstream - BEAM VON UNTEN - APV-Nummerierung in Beamrichtung von links anfangend
1) h21_alignment-TS05 - APV12 - 90°gedreht
2) h13_ITE-PAS - APV1
3) h14_ITE-PAS - APV1
4) h15_ITE-PAD - APV1
5) h16_ITE-PAD - APV1
6) h11_ITE-STD - APV1
7) h12_ITE-STD - APV1
8) h22-alignment-TS07 - APV12 - 90°gedreht
Schrauben verwenden je nach Sockel und Spacer
SiLC08-Stack
upstream - BEAM VON UNTEN - APV-Nummerierung in Beamrichtung von links anfangend
1) SiLC08-7 - APV12 - Überprüfen
2) SiLC08-6 - APV12 - Überprüfen
3) SiLC08-5 - APV12 - Überprüfen
4) SiLC08-4 - APV12 - Überprüfen
5) SiLC08-3 - APV12 - Überprüfen
6) SiLC08-2 - APV12 - Überprüfen
7) SiLC08-1 - APV12 - Überprüfen
8) SiLC08-0 - APV12 - Überprüfen
Schrauben verwenden je nach Sockel und Spacer |
|
15
|
Fri Aug 14 21:36:17 2009 |
Markus Friedl | | Config files | | | | |
Status of config files as of Friday 14 August 2009 late evening
| Config file name |
Timing adjusted |
Sensor definition |
Tested |
| cern09_ite128_single1 |
YES |
NOT YET (?) |
YES |
|
cern09_ite128_multi6
|
YES |
NOT YET (?) |
YES |
|
cern09_pt_ite512_single1
|
YES |
NOT YET (?) |
YES |
|
cern09_pt_ite512_multi6
|
YES |
NOT YET (?) |
NO |
|
cern09_alignment_beam_single1
|
YES |
NOT YET (?) |
YES |
|
cern09_alignment_beam_multi6
|
YES |
NOT YET (?) |
YES |
|
cern09_belle_single
|
YES |
NOT YET (?) |
YES |
|
cern09_belle_multi6
|
YES |
NOT YET (?) |
YES |
| cern09_silc_all_single |
YES (2008) |
YES (2008) |
NO |
| cern09_silc_all_multi6 |
YES (2008) |
YES (2008) |
NO |
|
|
6
|
Mon Jul 6 14:30:45 2009 |
Marko Dragicevic | | Equipment List | | | | |
Slow Control:
Source Measurement Unit Keithley K2410, Inv.Nr.: 540-702, 2000EUR
-- Koax-Kabel + Adapter auf Banane
Scanning Voltmeter Keithley K2700 , Inv.Nr.: 540-698, 2000EUR
-- Shunt-Widerstand-Platine
-- Flachbandkabel fuer Verbindung Shunt-Platine<->K2700
TRHX
-- 3 Sensoren
-- 2 lange Flachbandkabel, 1 serielles Kabel
LV-Power-Supplies, je 150EUR
-- GW Instek GPC-1850, SN.: 4080392
-- GW Instek GPC-1850D, Inv.Nr.: 545-059
-- GW Instek GPC-1850D, Inv.Nr.: 545-062
-- Systron Donner HR 20-10A, SN.: 781-092
-- Systron Donner HR 20-10A, SN.: 781-096
Oszilloskop Tektronix TDS 3054, SN.: B011109, 4000EUR
-- 4 probes
Die Katze (Belle-HV-Supply)
-- HV-Kabel 30m
GBIP-Kabel, 1x lang, 1x kurz
Signalgenerator Agilent 81110A, Inv.Nr.: 541-054, 3000EUR
DAQ:
Chrisu-PC, Inv.Nr.: 401-925
-- Monitore
---- Belinea, Inv.Nr.: 401-696
---- Gericom, SN.: M1132GR5467345
-- Keyboard & Maus
Wiener 9U-VME-Crate, Inv.Nr.: 545-043, 3000EUR
-- Power Supply
-- VME-Controller
-- 4 VME-Module (1x Buffer, 3x FADC)
DOCK-Box
-- Power Kabel
VME-Kabel (bockig) + Verlaengerung
30m-Kabel (8xCat7, 2xCat5, 2xgrau)
Lemo-Kabel
100pin-Flachkabel Neco-Buffer
Bananenkabel
Hybridkabel (8x SiLC, Belle-Kabel)
Special TLU-Adapter (flipping pin order of RJ45)
Schrauben für Crate-Montage
Erdungskabel (liegen am CERN im Labor)
THRX + Hum. Sensoren!
Magic Box
DUT:
Schrauben für Montage am Drehteller
4mm Steckschlauch Stickstoff (Laenge?)
Anschluss 1/8" auf 4mm Steckschlauch
Druckminderer, SN.: 717.06143
-- 6mm Snap-In
-- 6mm Schlauch
Chiller Huber ministat 230, Inv.Nr.: 482-021, 4000EUR
-- Manual
-- Netzteil
-- langes serielles Kabel
-- 5-6mm Schlauch
-- Adapter
-- 5 Liter dest. Wasser (falls noch Platz ist)
-- LabView (falls ferngesteuert)
Box-Deckel
Baseplates (4?)
Gaffa
Doppelscotch
Schwarze Selbstklebefolie
Alufolie
Sockel (2 verschiedene)
Schablonen für SiLC-Angle Scan (08-Modules)
gscheites Verlängerungskabel
genug Schrauben, Gewindestangen, Flügelmuttern
2 Balken für Pt-Module Drehungen (+ genug "Bolzen")
GROSSES SCHWARZES LICHTDICHTES TUCH !!!!
THRX-Kabel & Sensoren
25 Module
-- 4 Belle-Module (1 Stack)
-- 2 pt-Module
-- 2 Alignment-Module
-- 2 Stacks mit Warschau-Sensoren (1x 6 Sensoren, 1x 3 Sensoren)
-- 8 SiLC-Module (1 Stack)
EDV:
Netzwerkkabel
Netzwerk-Switch:
-- 3com Gigabit Switch 8, SN.: AB/9XRQ9J00171B0
-- D-Link 8-Port GBit-Switch
WLAN-Router: Linksys WRT54GL-DE, SN.: CL7B1H502248, 60 EUR
1TB externe Festplatte: Western Digital MyBook, SN.: WCA551469094
-- Netzgeraet
-- USB-Kabel
-- Firewire 400/800 Kabel
Webcam
USB-Stick
Etikettiergeraet: Brother P-touch 1000
Verlaengerungskabel ohne Ende…
1 Dose Druckluft zur Reinigung
Laptops
-- Apple MacBook (MV) Inv.Nr.: 401-810
-- Apple MacBook Pro (MD) Inv Nr.: 401-831
-- Apple MacBook (GA) SN.:W87411Q3Z5Z
2x PCI Express-Karten (noch zu kaufen), je 30EUR
2x USB-Seriell Adapter
1 Trommel Ethernet-Kabel (100m, vom Walzel)
einige RJ-45 Stecker
2.5" externe HD
CD und DVD Rohlinge
Tools:
Diverse Adaptoren Lemo-BNC, Lemo-Lemo
Taschenlampe + 2x Hirnbirn
Massband
Multimeter
Werkzeug (Schraubenzieher & Co)
Pinzetten
Laserpointer
Schwarze Fetzen
Scotch tape
Kabelbinder
Adapter f. Steckdosen
Verteiler-Leisten
Tixo klein & gross
Loetstation Advanced JBC, SN.: 76841165, inkl. Zubehoer
Ethernet-Crimp-Zange
Eisensagl
Schublehre
Misc:
Fondueset 
Spiegelreflex Digitalkamera Canon 450D (400EUR)
-- Stativ
-- Reflexionszelt
SLR Marko
Stativ
Scheinwerfer (fuer ordentliche Fotos)
Akkus+Ladegerät
Dickes Logbook
Kugelschreiber/Bleistifte
Pflaster
Carnet ATA |
| Attachment 1: carnet_aug09.xls
|
|
12
|
Tue Aug 11 14:03:57 2009 |
Marko Dragicevic | | Sensor Designs | | | | |
Screenshots
HEPHY Gallery
GDS File Viewer
KLayout Website
Layer Properties File Warsaw.lyp in den Attachments. |
| Attachment 1: Wafer.gds
|
| Attachment 2: SensorSTD.gds
|
| Attachment 3: SensorPAS.gds
|
| Attachment 4: SensorPAD.gds
|
| Attachment 5: Sensor512.gds
|
| Attachment 6: Warsaw.lyp
|
<?xml version="1.0"?>
<layer-properties>
 <properties>
  <frame-color>#01ff6b</frame-color>
  <fill-color>#01ff6b</fill-color>
  <frame-brightness>0</frame-brightness>
  <fill-brightness>0</fill-brightness>
  <dither-pattern>I3</dither-pattern>
  <visible>true</visible>
  <transparent>false</transparent>
  <width>1</width>
  <marked>false</marked>
  <animation>0</animation>
  <name>NPlus</name>
  <source>1/0@1</source>
 </properties>
 <properties>
  <frame-color>#ff0000</frame-color>
  <fill-color>#ff0000</fill-color>
  <frame-brightness>0</frame-brightness>
  <fill-brightness>0</fill-brightness>
  <dither-pattern>I9</dither-pattern>
  <visible>true</visible>
  <transparent>false</transparent>
  <width>1</width>
  <marked>false</marked>
  <animation>0</animation>
  <name>PPlus</name>
  <source>2/0@1</source>
 </properties>
 <properties>
  <frame-color>#ff8000</frame-color>
  <fill-color>#ff8000</fill-color>
  <frame-brightness>0</frame-brightness>
  <fill-brightness>0</fill-brightness>
  <dither-pattern>I0</dither-pattern>
  <visible>true</visible>
  <transparent>false</transparent>
  <width>1</width>
  <marked>false</marked>
  <animation>0</animation>
  <name>Via</name>
  <source>3/0@1</source>
 </properties>
 <properties>
  <frame-color>#00ffff</frame-color>
  <fill-color>#00ffff</fill-color>
  <frame-brightness>0</frame-brightness>
  <fill-brightness>0</fill-brightness>
  <dither-pattern>I15</dither-pattern>
  <visible>true</visible>
  <transparent>false</transparent>
  <width>1</width>
  <marked>false</marked>
  <animation>0</animation>
  <name>Metal</name>
  <source>4/0@1</source>
 </properties>
 <properties>
  <frame-color>#ff00ff</frame-color>
  <fill-color>#ff00ff</fill-color>
  <frame-brightness>0</frame-brightness>
  <fill-brightness>0</fill-brightness>
  <dither-pattern>I2</dither-pattern>
  <visible>true</visible>
  <transparent>false</transparent>
  <width>1</width>
  <marked>false</marked>
  <animation>0</animation>
  <name>Passivation</name>
  <source>5/0@1</source>
 </properties>
 <properties>
  <frame-color>#91ff00</frame-color>
  <fill-color>#91ff00</fill-color>
  <frame-brightness>0</frame-brightness>
  <fill-brightness>0</fill-brightness>
  <dither-pattern>I3</dither-pattern>
  <visible>true</visible>
  <transparent>false</transparent>
  <width>1</width>
  <marked>false</marked>
  <animation>0</animation>
  <name>PolySilicon</name>
  <source>6/0@1</source>
 </properties>
 <properties>
  <frame-color>#008050</frame-color>
  <fill-color>#008050</fill-color>
  <frame-brightness>0</frame-brightness>
  <fill-brightness>0</fill-brightness>
  <dither-pattern>I2</dither-pattern>
  <visible>true</visible>
  <transparent>false</transparent>
  <width>1</width>
  <marked>false</marked>
  <animation>0</animation>
  <name>PolySiHeads</name>
  <source>7/0@1</source>
 </properties>
 <properties>
  <frame-color>#ffa080</frame-color>
  <fill-color>#ffa080</fill-color>
  <frame-brightness>0</frame-brightness>
  <fill-brightness>0</fill-brightness>
  <dither-pattern>I0</dither-pattern>
  <visible>true</visible>
  <transparent>false</transparent>
  <width>1</width>
  <marked>false</marked>
  <animation>0</animation>
  <name>Via2</name>
  <source>8/0@1</source>
 </properties>
 <properties>
  <frame-color>#000080</frame-color>
  <fill-color>#000080</fill-color>
  <frame-brightness>0</frame-brightness>
  <fill-brightness>0</fill-brightness>
  <dither-pattern>I12</dither-pattern>
  <visible>true</visible>
  <transparent>false</transparent>
  <width>1</width>
  <marked>false</marked>
  <animation>0</animation>
  <name>Metal2</name>
  <source>10/0@1</source>
 </properties>
 <properties>
  <frame-color>#ffa080</frame-color>
  <fill-color>#ffa080</fill-color>
  <frame-brightness>0</frame-brightness>
  <fill-brightness>0</fill-brightness>
  <dither-pattern>I1</dither-pattern>
  <visible>true</visible>
  <transparent>false</transparent>
  <width>1</width>
  <marked>false</marked>
  <animation>0</animation>
  <name>Margins</name>
  <source>11/0@1</source>
 </properties>
 <properties>
  <frame-color>#805000</frame-color>
  <fill-color>#805000</fill-color>
  <frame-brightness>0</frame-brightness>
  <fill-brightness>0</fill-brightness>
  <dither-pattern>I0</dither-pattern>
  <visible>true</visible>
  <transparent>false</transparent>
  <width>1</width>
  <marked>false</marked>
  <animation>0</animation>
  <name>Dicing Lines</name>
  <source>12/0@1</source>
 </properties>
 <custom-dither-pattern>
  <pattern>
   <line>................................</line>
   <line>................................</line>
   <line>................................</line>
   <line>................................</line>
   <line>................................</line>
   <line>................................</line>
   <line>................................</line>
   <line>................................</line>
   <line>................................</line>
   <line>................................</line>
   <line>................................</line>
   <line>................................</line>
   <line>................................</line>
   <line>................................</line>
   <line>................................</line>
   <line>................................</line>
   <line>................................</line>
   <line>................................</line>
   <line>................................</line>
   <line>................................</line>
   <line>................................</line>
   <line>................................</line>
   <line>................................</line>
   <line>................................</line>
   <line>................................</line>
   <line>................................</line>
   <line>................................</line>
   <line>................................</line>
   <line>................................</line>
   <line>................................</line>
   <line>................................</line>
   <line>................................</line>
  </pattern>
  <order>1</order>
  <name></name>
 </custom-dither-pattern>
</layer-properties>
|
|
20
|
Wed Aug 19 22:57:13 2009 |
Marko Dragicevic | | How-To | | | | |
TLU (run from DAQPCHEPHY):
ssh eudet@eudetmac001.cern.ch
ssh tlupc
~\eudaq\bin\TLUControl.exe -d1 -a12
-t100 internal trigger
-aXX Mask for Szintis:
1 4 mm (front)
2 4 mm (front)
4 9 mm (back)
8 9 mm (back)
DAQ:
Hostname: DAQPCHEPHY.CERN.CH
XY Table PC:
Hostname: XYPCEUDET.CERN.CH
Beam Control:
Hostname: cwo-hna453-h6b1.cern.ch
137.138.61.206
Eudet DAQ:
vnc eudetmac001.cern.ch
Cycle Run:
o) stop DAQ
o) kill eudaq Run Control
o) restart: ./STARTRUN.FORTIS.1
o) load config: testfortis_with_eudrb_beam_backpressure_WITH_SILC
o) press: Config (wait ~1 min.)
o) press: Start |
|
80
|
Sun Aug 23 13:15:42 2009 |
Marko Dragicevic | Pt_ITE512 | Current and Humindity during first Run | | | | |
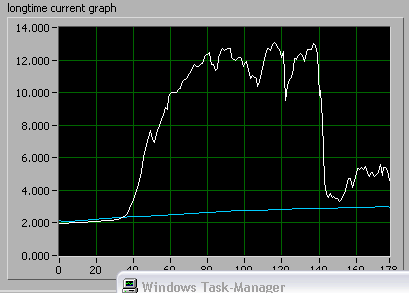
Current of Pt modules during first run
Data of the run was dicarded.
Compressed air flow was at ~2 bars during run. Graph shows RH rise after switching of CA flow. Restarted at around 7% with very low pressure.
Timescales for RH and I graph are different!!!
after 3 hours first bottle of compressed air (dewpoint -170 degree C) is gone and sensor Pt-h01 starts to fluctuate again
Current of ITE512 plus 2 SiLC08 modules
HV=70V, Current: 25uA first, 29uA then, 35uA latest. now stable
|
| Attachment 1: IandRH_first_Pt_run.png
|
 |
| Attachment 2: Picture_1.png
|
 |
|
95
|
Tue Aug 25 09:01:12 2009 |
Marko Dragicevic | Pt_ITE512 | Pt_ITE512 2deg air | run034 | 20k | 25.08.09 08:56:18 | 25.08.09 09:45: |
Pt: 2 Grad, HV=200V, 0% RH, beam on, 120GeV
ITE512: HV=70V,
X-Y-Table: x=99.6, y=36 |
|
96
|
Tue Aug 25 09:53:16 2009 |
Marko Dragicevic | Pt_ITE512 | Pt_ITE512 4deg NO air! | run035 | 20k | 25.08.2009 09:50 | 25.08.2009 11:00 |
Pt: 4 Grad, HV=200V, 0% (start run) to 14% (end run) RH, beam on, 120GeV
ITE512: HV=70V,
X-Y-Table: x=99.6, y=36 |
|
98
|
Tue Aug 25 12:30:04 2009 |
Marko Dragicevic | Pt_ITE512 | Pt_ITE512 8deg NO air! | run037 | 20k | 25.08.2009 12:45 | 25.08.2009 13:40:13 |
Pt: 8 Grad, HV=200V, 28% (start run) to 31% (end run) RH, beam on, 120GeV
ITE512: HV=70V, I=49.1muA
X-Y-Table: x=99.6, y=36 |
|
99
|
Tue Aug 25 13:48:30 2009 |
Marko Dragicevic | Pt_ITE512 | Pt_ITE512 10deg NO air! | run038 | 20k | 25.08.2009 13:54:54 | 25.08.2009 15:22:38 |
Pt: 10 Grad, HV=200V, 31.7% (start run) to 33.8% (end run) RH, beam on, 120GeV
ITE512: HV=70V, I=50muA
X-Y-Table: x=99.6, y=36 |
|
100
|
Tue Aug 25 15:33:07 2009 |
Marko Dragicevic | Pt_ITE512 | Pt_ITE512 12deg NO air! | run039 | 20k | 25.08.2009 15:35 | 25.08.2009 17:10 |
Pt: 12 Grad, HV=200V, 34.4% (start run) to 36.1% (end run) RH, beam on, 120GeV
ITE512: HV=70V, I=50muA
X-Y-Table: x=99.6, y=36 |
|
101
|
Tue Aug 25 17:14:52 2009 |
Marko Dragicevic | Pt_ITE512 | Pt_ITE512 17deg NO air! | run040 | 20k | 25.08.2009 17:17:11 | 25.08.2009 18:08:57 |
Pt: 17 Grad, HV=200V, 36.5% (start run) to xx.1% (end run) RH, beam on, 120GeV
ITE512: HV=70V, I=51muA
X-Y-Table: x=99.6, y=36 |
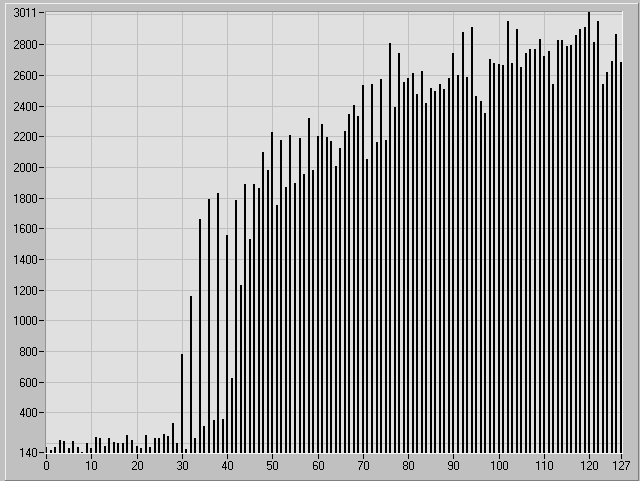
| Attachment 1: Pt-17deg.png
|
 |